Category Archives: Fedora

Systemd Sucks… Up Your Disk Space

Over the last several years, the advent of systemd has been somewhat controversial in the Linux world. While it undeniably has a lot of features that Linux has been lacking for some time, many people think that it has gone too far: They think it insinuates itself into places it shouldn’t, unnecessarily replaces functionality that didn’t need to be replaced, introduces bloat and performance issues, and more.

I can see both sides of the argument and I’m personally somewhat ambivalent about the whole thing. What I can tell you, though, is that the default configuration in Fedora has a tendency to suck up a lot of disk space.

Huge… tracts of land

The /var/log/journal directory is where systemd’s journal daemon stores log files. On my Fedora systems, I’ve found that this directory has a tendency to grow quite large over time. If left to its own devices, it will often end up using many gigabytes of storage.

Now that may not sound like the end of the world. After all, what are a few gigabytes of log files on a modern system that has multiple terabytes of storage?

Like the whole systemd argument, you can take two different perspectives on this:

Perspective 1: Disk is cheap, and if I’m not using that disk space for anything else, why not go ahead and fill it up with journal daemon logs?

Perspective 2: Why would I want to keep lots of journal daemon logs on my system that I probably won’t ever use?

I tend to take the second perspective. In my case, this is compounded by several other factors:

  1. I keep my /var/log directory in my root filesystem and deliberately keep that small (20GB), so I really don’t want it to fill up with unnecessary log files.
  2. I back up my entire root filesystem nightly to local storage and replicate that to remote storage. Backing up these log files takes unnecessary time, bandwidth, and storage space.
  3. I have a dozen or so KVM virtual machines and LXC containers on my main server. If I let the journal daemon logs on all of these run amok that space really starts to add up.

Quick and Dirty Cleanup

If you’re just looking to do some quick disk space reclamation on your system, you can do this with the the ‘journalctl’ command:

journalctl --vacuum-size=[size]

Quick note: Everything in this post requires root privileges. For simplicity, I show all the commands being run from a root shell. If you’re not running in a root shell, you’ll need to preface each command with ‘sudo’ or an equivalent to run the command with root privileges.

When using the journalctl command above, you specify what size you want the systemd journal log files to take up, and it will try to reduce the journal log files to that size.

Note that I say try. This command can’t do anything to log files that are currently open on the system, and various other factors may reduce its ability to actually reduce the total amount of space used.

Here’s an example I ran within an LXC container:

[root@server ~]# du -sh /var/log/journal
168M /var/log/journal
[root@server ~]# journalctl --vacuum-size=10M
Deleted archived journal /var/log/journal/ac9ff276839a4b429790191f8abb21c1/system@f24253741e8c412a9fe94a48257c2b35-0000000000000001-00055dcc288c8a73.journal (16.0M).
Deleted archived journal /var/log/journal/ac9ff276839a4b429790191f8abb21c1/user-2000@b54e732b7ea1430c95020d6a6553dccb-0000000000000f7b-00055dcef80287ee.journal (8.0M).
Deleted archived journal /var/log/journal/ac9ff276839a4b429790191f8abb21c1/system@f24253741e8c412a9fe94a48257c2b35-0000000000002c74-00056030edf54f82.journal (8.0M).
Deleted archived journal /var/log/journal/ac9ff276839a4b429790191f8abb21c1/user-2000@b54e732b7ea1430c95020d6a6553dccb-0000000000002d0e-00056056271d449c.journal (8.0M).
Deleted archived journal /var/log/journal/ac9ff276839a4b429790191f8abb21c1/system@f24253741e8c412a9fe94a48257c2b35-0000000000003d92-00056295d1dfc0cb.journal (8.0M).
Deleted archived journal /var/log/journal/ac9ff276839a4b429790191f8abb21c1/user-2000@b54e732b7ea1430c95020d6a6553dccb-0000000000003e4d-000562bca405ac7c.journal (8.0M).
Deleted archived journal /var/log/journal/ac9ff276839a4b429790191f8abb21c1/system@000562f8e6bc4730-4bc5e6409eab3024.journal~ (8.0M).
Deleted archived journal /var/log/journal/ac9ff276839a4b429790191f8abb21c1/system@866bd5425da84c0387e801f0d9f0dbe0-0000000000000001-0005630ace84e3a6.journal (8.0M).
Deleted archived journal /var/log/journal/ac9ff276839a4b429790191f8abb21c1/system@0005630ace895afa-db4ba70439580a20.journal~ (8.0M).
Deleted archived journal /var/log/journal/ac9ff276839a4b429790191f8abb21c1/user-2000@b54e732b7ea1430c95020d6a6553dccb-0000000000004f97-00056526bc67d197.journal (8.0M).
Deleted archived journal /var/log/journal/ac9ff276839a4b429790191f8abb21c1/system@000567364f741221-fef3cfcfe59c68bc.journal~ (8.0M).
Deleted archived journal /var/log/journal/ac9ff276839a4b429790191f8abb21c1/system@00056779411bc792-2224320b49ef5929.journal~ (8.0M).
Deleted archived journal /var/log/journal/ac9ff276839a4b429790191f8abb21c1/system@7e3dc17225834c50ab9cbec8c0551dc4-0000000000000001-000567794116176d.journal (8.0M).
Deleted archived journal /var/log/journal/ac9ff276839a4b429790191f8abb21c1/user-2000@b54e732b7ea1430c95020d6a6553dccb-0000000000006c42-000567adbbc43bff.journal (8.0M).
Deleted archived journal /var/log/journal/ac9ff276839a4b429790191f8abb21c1/system@000567ef1af7e427-3c61c0089c605c91.journal~ (8.0M).
Deleted archived journal /var/log/journal/ac9ff276839a4b429790191f8abb21c1/system@ae06f5eac535470a823d126d23143e57-0000000000000001-000569a28b47d93a.journal (8.0M).
Vacuuming done, freed 136.0M of archived journals from /var/log/journal/ac9ff276839a4b429790191f8abb21c1.
[root@server ~]# du -sh /var/log/journal
32M /var/log/journal

As you can see, while this did reduce the logs significantly (from 168M to 32M), it was unable to reduce them down to the 10M that I requested.

It’s also really important to remember that cleaning up log files with journalctl is not a permanent solution. Once you clean them up they’ll just start growing again.

The Permanent Fix

The way to permanently fix the problem is to update the journal daemon configuration to specify a maximum retention size. The configuration file to edit is /etc/systemd/journald.conf. On a Fedora system the default configuration file looks something like this:

# This file is part of systemd.
#
# systemd is free software; you can redistribute it and/or modify it
# under the terms of the GNU Lesser General Public License as published by
# the Free Software Foundation; either version 2.1 of the License, or
# (at your option) any later version.
#
# Entries in this file show the compile time defaults.
# You can change settings by editing this file.
# Defaults can be restored by simply deleting this file.
#
# See journald.conf(5) for details.

[Journal]
#Storage=auto
#Compress=yes
#Seal=yes
#SplitMode=uid
#SyncIntervalSec=5m
#RateLimitIntervalSec=30s
#RateLimitBurst=1000
#SystemMaxUse=
#SystemKeepFree=
#SystemMaxFileSize=
#SystemMaxFiles=100
#RuntimeMaxUse=
#RuntimeKeepFree=
#RuntimeMaxFileSize=
#RuntimeMaxFiles=100
#MaxRetentionSec=
#MaxFileSec=1month
#ForwardToSyslog=no
#ForwardToKMsg=no
#ForwardToConsole=no
#ForwardToWall=yes
#TTYPath=/dev/console
#MaxLevelStore=debug
#MaxLevelSyslog=debug
#MaxLevelKMsg=notice
#MaxLevelConsole=info
#MaxLevelWall=emerg

The key line is “#SystemMaxUse=”. To specify the maximum amount of space you want the journal daemon log files to use, uncomment that line by removing the hash mark (‘#’) at the start of the line and specify the amount of space after the equals (‘=’) at the end of the line. For example:

SystemMaxUse=10M

You can use standard unit designators like M for megabytes or G for gigabytes.

Once you’ve updated this configuration file, it will take effect the next time the journal deamon restarts (typically upon system reboot). To make it take effect immediately, simply tell systemd to restart the journal daemon using the following command:

systemctl restart systemd-journald

Note that if you’ve specified a very small size, like the example above, this still might not shrink the logs down to the size specified. For example:

[root@server ~]# systemctl restart systemd-journald
[root@server ~]# du -sh /var/log/journal
32M /var/log/journal

As  you can see, we still haven’t reduced the log files down below the maximum size we specified. To do so, you have to stop the journal daemon, completely remove the existing log files, and then restart the journal daemon:

[root@server ~]# systemctl stop systemd-journald
Warning: Stopping systemd-journald.service, but it can still be activated by:
systemd-journald.socket
systemd-journald-audit.socket
systemd-journald-dev-log.socket
[root@server ~]# rm -rf /var/log/journal/*
[root@server ~]# systemctl start systemd-journald
[root@server ~]# du -sh /var/log/journal
1.3M /var/log/journal

Ta-da! Utilization is now down to a minimal amount, and as the log grows the journal daemon should keep it to down to a size less than the maximum amount you’ve specified.

Pigs In Space

Today I noticed that my root filesystem has a little less free space than I would really like it to have, so I decided to do a bit of cleanup…

Finding The Space Hogs

I’m a bit old-fashioned, so I still tend to do this sort of thing from the command line rather than using fancy GUI tools. Over the years, this has served me well, because I can get things done even if I only have terminal access to a system (e.g., via ssh or a console) and only have access to simple standard commands on a system.

One quick trick is that you can easily find the top ten space hogs within any given directory using the following command:

du -k -s -x * | sort -n -r | head

Let me break down what this does.

The ‘du’ command provides you with information on disk usage. Its default behavior is to give you a recursive listing of how much space is used beneath all directories from the current directory on down.

The ‘-k’ option tells du to report all utilization numbers using kilobytes. This will be important in a moment when we sort the list, as most modern versions of du will default to using the most appropriate unit. it’s much easier for a generic sort program to automatically sort 1200 and 326 than it is to sort 1.2G and 326M.

The ‘-s’ option tells du to only report a sum for each file or directory specified, rather than also recursively reporting on all of the subdirectories underneath.

The ‘-x’ option tells du to stay within the same filesystem. This is important if you’re exploring a filesystem that might have other filesystems mounted beneath it, as it tells du not to include information from those other filesystems. For instance, if you’re trying to clean up /var and /var/lib/lxc is a different filesystem mounted from its own separate storage, you don’t want to include the stuff under /var/lib/lxc in your numbers.

Finally, we specify an asterisk wildcard (‘*’) to tell du to spit out stats for each file and directory within the current directory. (Note that if you have hidden files or directories — files that begin with a ‘.’ in the Linux/Unix world — the asterisk will ignore those by default in most shells.)

Next, we pipe the output of the du command to the ‘sort’ command, which does pretty much exactly what it sounds like it should do.

The ‘-n’ option tells sort to do a numeric sort rather than a string sort. By default sort will use a string sort, which would yield results like “1, 10, 11, 2, 3” instead of “1, 2, 3, 10, 11”.

The ‘-r’ option tells sort that we want it to output results in reverse order (i.e., last to first, or biggest to smallest).

Finally, we pipe the sorted output to the ‘head’ command. The head command will spit out the “head,” or the first few lines of a file. By default, head will spit out the first ten lines of a file.

The net result is that this command gives the top ten space hogs in the current directory.

On my system I know that it’s almost invariably the /var filesystem that sucks up space on my root filesystem, so I started there:

[root@server ~]# cd /var
[root@server var]# du -k -s -x * | sort -n -r | head
3193804 lib
2859856 spool
1386684 log
195932 cache
108 www
88 tmp
12 kerberos
12 db
8 empty
4 yp

This tells me that I need to check out /var/lib, /var/spool, and /var/log. The /var/cache directory might yield a little space if cleaned up, but probably not a lot, and everything else is pretty much beneath my notice.

From here, I basically just change directory to each of the top hitters and repeat the process, cleaning up unnecessary files as I go along.

Fedora 18 Installer: Part 3

This is Part 3 of a multi-part review of Fedora 18’s updated and redesigned installer:

This review specifically covers how the Fedora 18 installer works for a relatively complex installation: What happens if you have an existing server with multiple disks, multiple RAID arrays, multiple volume groups and logical volumes, and you want to install Fedora 18 in addition to what’s already on the system without wrecking the existing setup?

Technical content: HIGH
This post is primarily aimed at experienced Linux system administrators.

Installation Options Dialog

After you’ve selected at least one storage devices on the Installation Destination screen, you’ll notice that the Continue button in the lower right corner becomes available. Once you’ve selected the storage devices that you want to use, you have two options: You can either click the Done button in the upper left corner, or the Continue button in the lower right corner.

If you click the “Done” button in the upper left, the installer will assume that you want to use automatic partitioning (with it’s potential attendant pitfalls, as discussed in Part 2). If, instead, you click on the Continue button, you’ll be presented with the Installation Options dialog box:

Installation Options Dialog

Click to view full size.

Thumbs Up
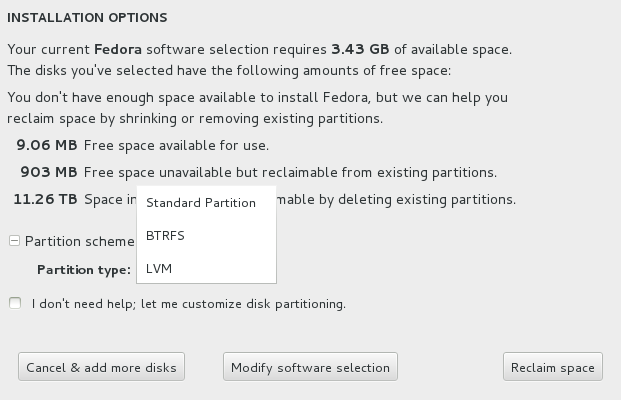
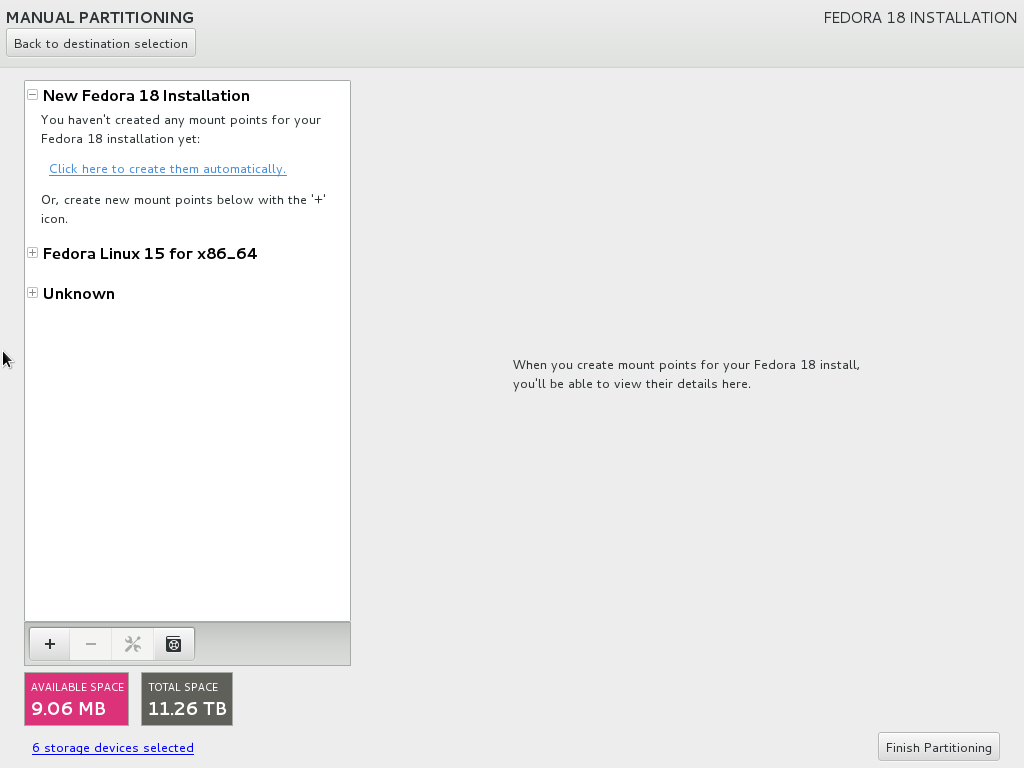
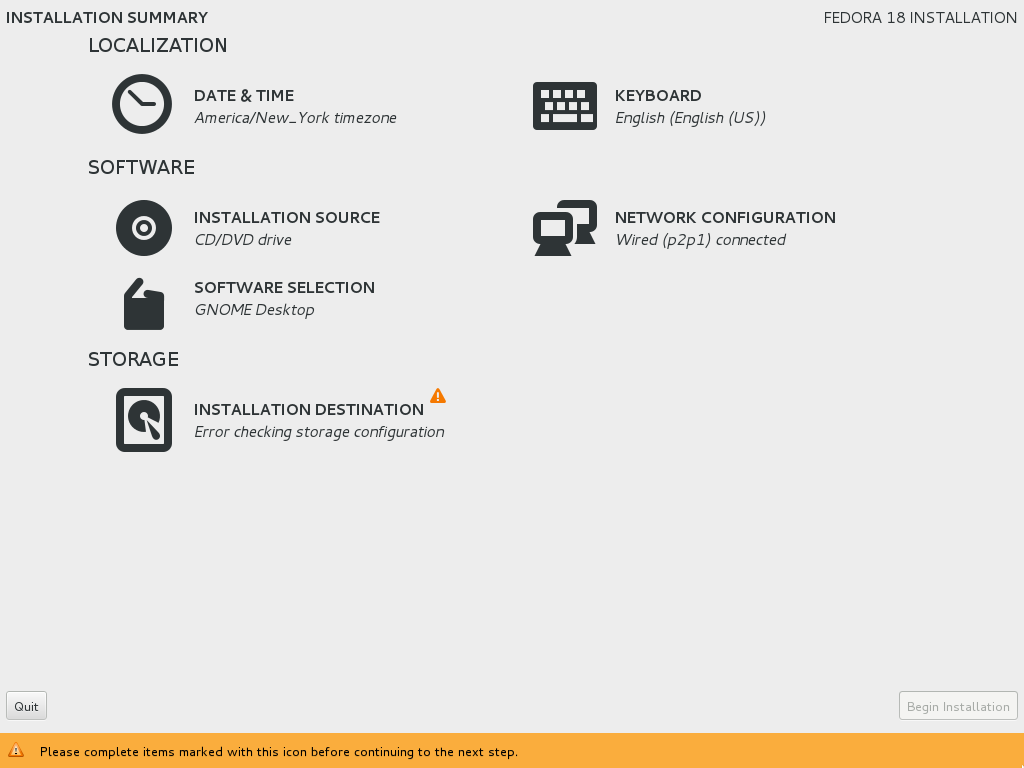
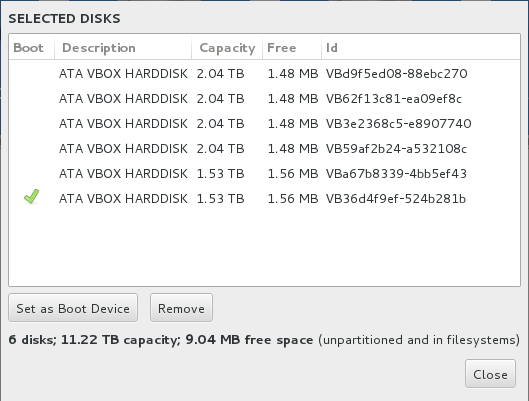
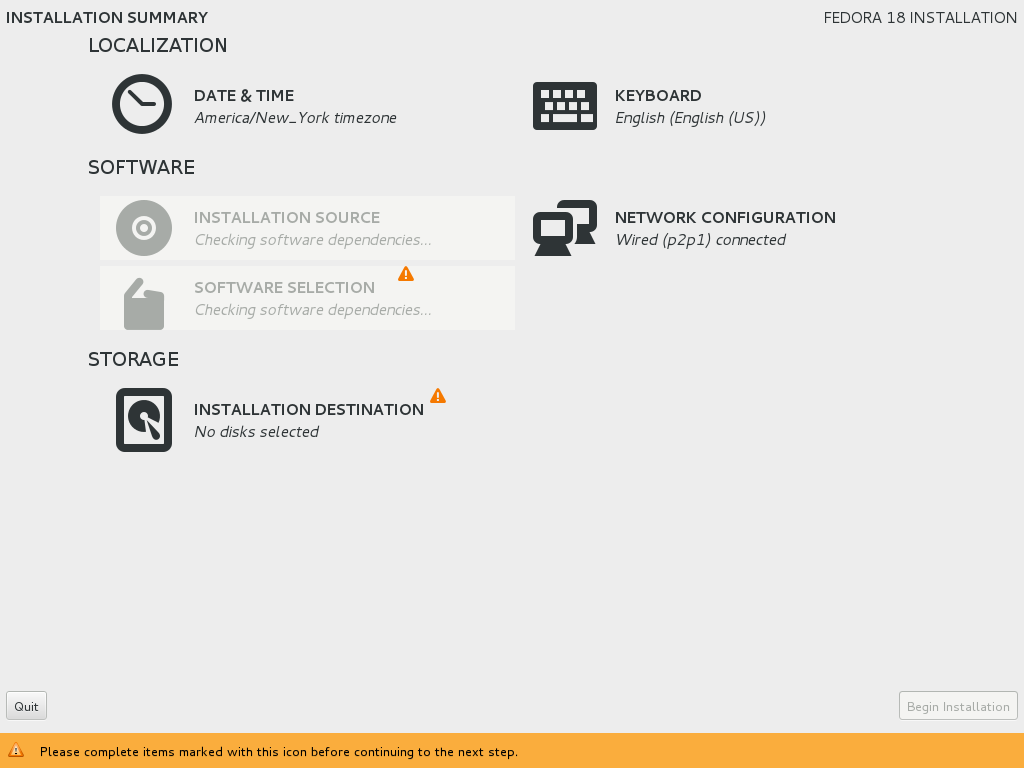
First of all, this dialog box provides summary information about your planned install and the disks that you’ve selected. It’s nice to have all this information in one place, especially at this point in the install. It’s particularly nice that the very first thing this dialog tells you is exactly how much space your install will need, and it’s also nice that it tells you straight out whether or not you have enough free space available on the selected storage devices to proceed.

Unfortunately, once again there are far more things wrong with this dialog than right with it.

Thumbs Down
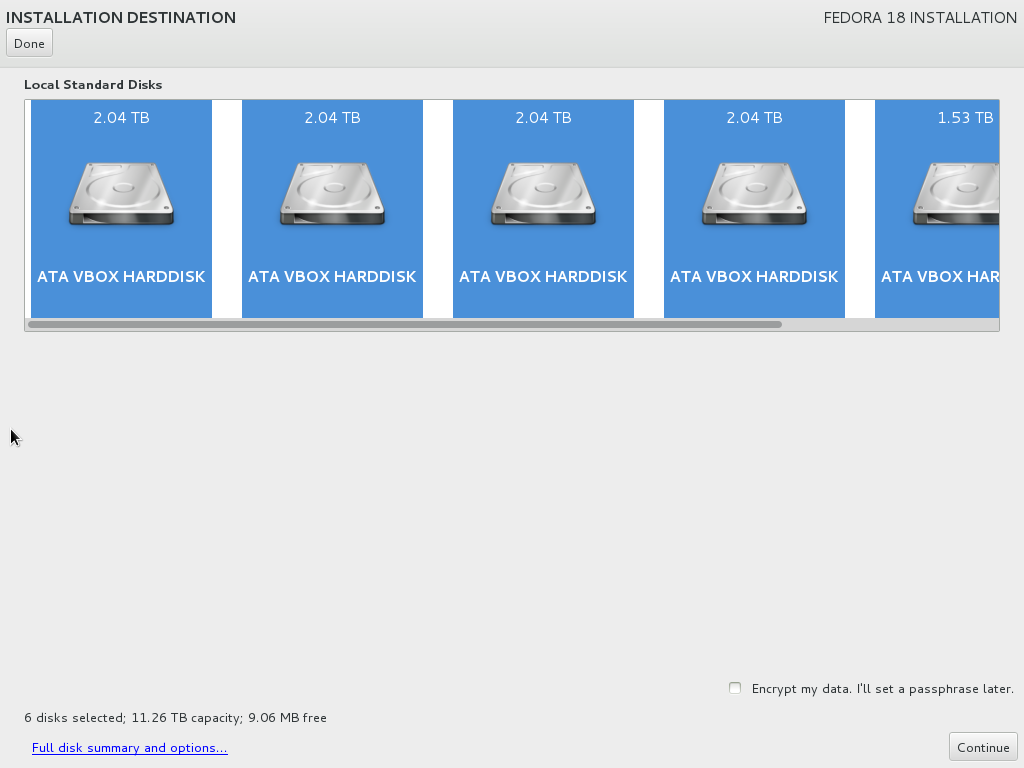
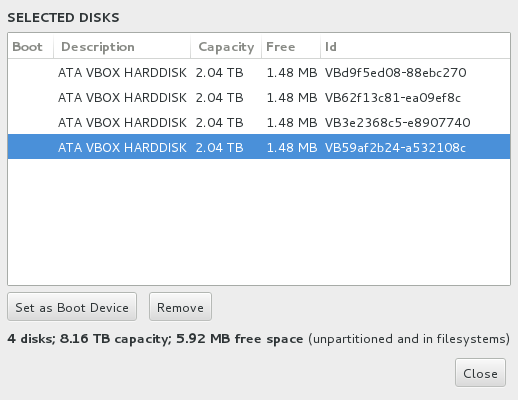
First of all, somebody clearly skipped “Information Presentation 101” class. The dialog says “The disks you’ve selected have the following amounts of free space:”, but then tells you whether or not you have enough space before it actually provides information on the amount of free space. I know this is just a nit-pick, but simple layout errors like this really make it clear that the new installer just isn’t ready for prime-time.
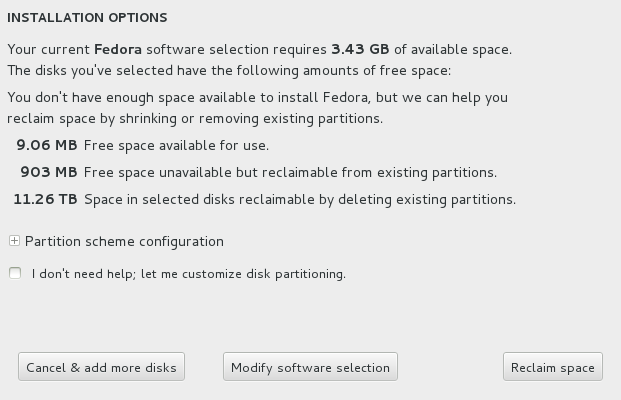
More importantly, it’s not clear where some of these numbers come from, and they completely ignore obvious unallocated space that the install could take advantage of (more on that in a moment).

Below all the disk space statistics, there’s an expandable section of the dialog entitled “Partition scheme configuration.” If you open this up, you’re presented with a single field, “Partition type” that gives you a choice between “Standard Partition,” “BTRFS,” and “LVM” (with LVM selected by default):

Partition Scheme

Click to view full size.

I’m at a loss as to why they chose to make an expandable section that only contains a single field, when just putting the field on the dialog would have been much simpler. It seems to be yet another design decision betraying an immature product. Worse, there’s absolutely no information as to what this field means or what selecting any of these items will do.

As an expert user, I can guess that this simply adjusts how the system will do things if you let it perform automatic partitioning. Selecting “Standard Partition” will create and use partitions for your major filesystems. BTRFS, will use the new BTRFS filesystem to allocate storage in some sort of (presumably) redundant and expandable fashion. And of course, LVM will use the current standard default of using logical volume management for your filesystems.

If you’re a non-expert user, though, this field is going to be completely incomprehensible, with no help in sight. (Frankly, even the online documentation on the web isn’t very good at describing exactly what these options do.)

Below the Partition scheme configuration section, you can check a check box that says “I don’t need help; let me customize disk partitioning.” This does exactly what it sounds like, and expert users will want to use this for anything other than a simple configuration.

Finally, at the bottom of the dialog, there are three buttons:

“Cancel & add more disks” does exactly what it sounds like, but I don’t know why they didn’t just leave it as a simple “Cancel” button.

The “Modify software selection” button will take you to the Software Selection screen that’s available from the main Installation Summary screen (and will take you back to the Installation Summary screen when you’re done rather than bringing you back to this dialog). This button frankly seems a little out of place here, but I’m guessing it’s here in case you suddenly realize the amount of software you’re trying to install exceeds the amount of disk space you have available.

Finally, there’s a “Reclaim space” button. As others have pointed out, this is probably the scariest button in the entire installer. There’s absolutely no information about what pressing this button will do. If you click this button are you telling the installer to just go ahead and start messing with your partitions and filesystems to reclaim space? What if you have no need or desire to reclaim any space at all on the system?

The simple fact is that the “Reclaim space” button is nothing more or less than a simple “Continue” or “Next” button, and should have been labeled exactly that. Labeling it “Reclaim space” was a terrible decision.

Where exactly is that reclaimable space?

As I mentioned above, it’s not clear where some of the numbers on the Installation Options dialog box come from. On my install, it said that there was “903 MB Free space unavailable but reclaimable from existing partitions,” but provided no information on where this space might come from.

It turns out that the only way to find out is to click on the “Reclaim space” button without checking the “let me customize disk partitioning” check box. If you do so, you’ll get to a Reclaim Disk Space dialog box:

Reclaim Disk Space Dialog

Click to view full size.

As you can see, in my particular case, that 903 MB of reclaimable space is what the installer could get if it shrunk my existing /boot partition down to eliminate the free space on the filesystem.

But what about those empty partitions?

Meanwhile, the installer completely ignored the terabytes of space available in the many unused and empty partitions on my test system.

There are two schools of thought you can subscribe to here: The first is that the installer should only tell you about stuff that it absolutely understands. Thus, a partition containing an ext4 filesystem with unused space on it is fair game. However, a partition that appears to be empty might actually contain a filesystem, RAID setup, or logical volume that the installer is simply unable to comprehend, and should thus be left safely alone. The other school of thought is that you should at least point out apparently empty partitions for potential reclamation.

Clearly, the Fedora maintainers chose to go with the safer option. Given that the new installer appears to be aimed at neophyte users, and that most expert users with complicated installs will manually partition, this is a rational decision.

But what about unallocated LVM extents?

However, my test machine also had LVM volume groups with terabytes of unallocated extents on them. I simply cannot comprehend why the installer assumed those were off-limits. If you have unallocated space on volume groups, one of the main reasons for doing so is to let you later use that space for new filesystems — such as for an updated OS install. Why on earth doesn’t the installer offer to put your install on that free space?

I thought you said it was reclaimable?

A much bigger problem, though, is that the installer doesn’t seem to actually be able to reclaim the space that it says is reclaimable. If you highlight that /boot partition, the dialog box gives you two options: Preserve or Delete. There’s no option to “shrink” the partition or “reclaim space” from the partition. Just Preserve or Delete.

You may think “Okay… So maybe the button is just misleadingly named, like other buttons in this installer. Maybe the delete button will just delete the free space.” If you hit the Delete button, though, absolutely nothing happens. The “Reclaim space” button in the lower right of the dialog box stays grayed-out, and the only thing you can do is hit the Cancel button:

You cannot reclaim disk space.

Click to view full size.

You simply cannot do anything with that partition.

If you click delete on one of the “Unknown” partitions, it at least lights up the Reclaim space button at the bottom and lets you proceed. However, when I actually tried to reclaim space by deleting unused partitions here, I never got it to work. One time it sent me back to the Installation Summary screen and gave me the same error that I’d seen when I simply didn’t select any disks. Another time, the installer sent me back to the Installation Summary screen and then locked up. And a third time, the installer crashed with an “An unknown error has occurred” dialog.

An unknown error has occurred

Click to view full size.

Perhaps the space reclamation capabilities are implemented and work properly for Windows (FAT/NTFS) partitions, but I didn’t test that. Based on my experience with the rest of the Reclaim Disk Space dialog, I’d personally be very hesitant to try it out on any filesystem containing data I cared about keeping.

Manual Partitioning

If you check the “let me customize disk partitioning” check box, the Installation Options dialog will gray out the “Cancel & add more disks” and “Modify software selection” buttons, leaving only the “Reclaim space” button available.

Why gray those button out? Who knows — it’s yet another poor design decision.

And of course, as discussed earlier, what if you have no desire to actually reclaim any disk space? What if you’re just going to use free space on existing volume groups? Your only choice is to click on that poorly named “Reclaim space” button.

When you do so, you’ll go to a Manual Partitioning screen:

Manual Partitioning

Click to view full size.

Originally, I tried to fit manual partitioning into this section, but it became too large, so I’m going to discuss manual partitioning in its own section, next.

Fedora 18 Installer: Part 2

This is Part 2 of a multi-part review of Fedora 18’s updated and redesigned installer:

This review specifically covers how the Fedora 18 installer works for a relatively complex installation: What happens if you have an existing server with multiple disks, multiple RAID arrays, multiple volume groups and logical volumes, and you want to install Fedora 18 in addition to what’s already on the system without wrecking the existing setup?

Technical content: HIGH
This post is primarily aimed at experienced Linux system administrators.

Storage Device Selection

In the Fedora 18 installer, once the initial Installation Summary screen finished probing hardware and checking software dependencies, there were no greyed-out sections left on the screen, and only one warning icon left. This was next to “Installation Destination.” Thus, logically, the first thing to do is to click on that.

When you do so, you’re presented with a screen showing all the storage devices in your system, and a warning at the bottom: “No disks selected; please select at least one disk to install to.”

Installation Destination screen

Click to view full size

Thumbs UpOnce again, this screen has some pros and cons.

What’s good about this screen is that it provides a visually pleasing and simple view of the storage devices in your system. It tells you what kind of devices they are, and how big they are.

I wish that I had more good things to say about this screen, but that’s really about it.

Thumbs DownHonestly, there are far more bad things to say about it:

First of all, if you have multiple identical storage devices in the system, it’s not immediately apparent which device is which: It’s not clear if they’re listed with sda at the left and sdz at the right or vice-versa (and indeed, some people have reported their devices showing up in reverse order from what’s expected). You can figure out which device is which by hovering your mouse over each icon. A tool-tip will tell you the device name and ID. You shouldn’t have to do that, though. That should be immediately visible on the screen.

Second, there’s absolutely no indication of whether any given storage device has anything on it or not. If you have six devices that are completely allocated, or six devices with absolutely nothing on them, they look identical on this screen. The pretty icons are nice, but wouldn’t you rather see a bar or pie chart showing how much of each storage device is already allocated? Better yet would be something that shows you what’s actually on the device (e.g., 30% Windows, 40% Linux, 10% Other, 20% Free).

The final problem is the navigation buttons. Both the naming and placement of the buttons is poorly thought out. It’s pretty much a standard convention to put all your navigation buttons together at the bottom of a given screen or dialog box, usually either centered or to the right. In this case, however, you have a “Continue” button in the bottom right corner (which is greyed out until you select at least one storage device) and a “Done” button in the upper left.

Why on earth aren’t the navigation buttons together at the lower right?!?

Worse yet is that “Done” button. What happens if you bring up this screen and then realize that you’re not ready to do your storage configuration yet? What if you want to go back to the installation summary screen and pick packages first? There’s no “Quit” or “Back” button. Instead, the only button you can push is “Done,” even if you’re clearly not done.

If you click that “Done” button without doing any storage configuration, it’ll take you back to the Installation Summary screen, where the Installation Destination icon will be greyed-out with an ominous sounding “Failed to save storage configuration” message:

Failed to save storage configuration

Click to view full size.

It’s pretty clear that the installer doesn’t keep track of storage device state information internally. Instead, it appears to rescan the devices at various points, such as when exiting the Installation Destination screen and returning to the Installation Summary screen. This temporarily causes completely unnecessary and potentially anxiety-inducing warning icons to pop up on the Installation Summary screen.

The “Failed to save storage configuration message” will clear after a short while and be replaced with a “No disks selected” message. Installation Destination will then be available again.

If you just click “Done” on the Installation Destination screen, the installer’s behavior is not particularly nice. However, it can get much worse if you select a storage device before clicking that Done button.

If you select one or more devices and then click the Done button instead of the Continue button, the installer will assume that you want to use automatic partitioning. If the storage device in question is blank or has enough space to handle an install, this works well, and it returns you to a nice clean Installation Summary screen:

Automatic Partitioning

Click to view full size.

However, it’s not obvious on the Installation Destination screen that “Done” means “Go ahead and do the rest automatically” whereas “Continue” means “I may want to do some customization.” As an expert user, I don’t like the fact that the installer doesn’t ask whether I really wanted to use automatic partitioning.

You may argue that doing automatic partitioning is a good idea if you just select some storage devices and then click Done, especially for inexperienced users. I can certainly see the logic of that argument. However, most inexperienced users will be probably installing on a system that already has a fully allocated disk. What happens if you just click Done in that scenario?

It’s not pretty. Upon returning to the Installation Summary screen, you’ll again get that ugly “Failed to save storage configuration.” However, this time it won’t revert to a simple “No disks selected” message. Instead, it will say “Error checking storage configuration”:

Error checking storage configuration

Click to view full size.

So… back to the Installation Destination screen you’ll go.

As you click on storage devices to select them, the number of disks selected, total capacity, and amount of space free will update in the lower left corner:

Selecting disks

Click to view full size.

Thumbs DownHowever, even after selecting storage devices, that’s all the information that you get. On this screen you can’t get any more detailed information about partitions that already exist on the devices, RAID or LVM configuration, etc. Even right-clicking on a storage device does nothing.

You get number of disks selected, total capacity, and total amount of space free. That’s it.

Selected Disks Dialog

There is a “Full disk summary and options…” link in the lower left corner of the screen. This is another example of the relative immaturity and inconsistency of the new installer design, as this isn’t a button. Instead, it has the appearance of a hyperlink — the only one to be found anywhere in the installer.

You might think that this will bring up additional detail on existing partitions, etc. for the storage devices. It doesn’t. If you click on that link, it brings up a dialog box that provides exactly two pieces of information not available on the previous screen: It tells you how much free space there is on each device, and it’ll tell you if one of the devices is set as your boot device. (It also shows the ID for each device, but that’s available in a tool-tip if you hover over the disk in the main screen.) Remarkably, even this dialog doesn’t show the device name (e.g., sda, sdb, etc.):

Full disk summary and options dialog

Click to view full size.

This dialog exhibits some potentially problematic behavior when it comes to automatically selecting and remembering the boot device:

When you bring up the Selected Disks dialog it will remember if a boot device was previously specified. If that storage device is still selected it will keep that as the boot device. If, however, no boot device has been specified, or if a device that was previously specified as a boot device is no longer selected, it will automatically select the first storage device from the devices that are currently selected as the boot device.

This may seem like obvious and correct behavior, but it can have some unintended side effects if you happen to bring up the Selected Disks dialog before you’ve selected the storage device that you want as your boot device.

For instance, if you select only sdf on the Installation Destination screen and then bring up the Selected Disks dialog, it will automatically select sdf as your boot device:

Only sdf selected

Click to view full size.

If you then close the Selected Disks dialog, select additional storage devices, and bring up the Selected Disks dialog box again, the installer will still think that sdf should be your boot device:

Additional disks selected

Click to view full size.

This is admittedly a fringe case, but it’s another example of an area where the new installer simply isn’t mature. Personally, I’d suggest that better behavior would be to only remember a selected boot device if the user manually specifies one. If the user didn’t manually specify a boot device, then the installer should re-select the best boot device from the selected storage devices each time the dialog is brought up.

One final note on the Selected Disks dialog: In playing around with the installer, this is one area where I encountered bugs on a few occasions. For instance, at one point I managed to somehow confuse the installer into having no boot device selected:

No boot device selected

Click to view full size.

I haven’t yet been able to figure out how I managed to do this or reproduce the problem, but at least the installer seemed to recognize that there was a problem, as it draped an orange warning bar across the bottom of the screen complaining that “You have chosen to skip bootloader installation. Your system may not be bootable.”

At another point, I managed to confuse the system into apparently thinking that the part of the screen where it could display the storage device selection list was smaller than the rest of the screen, resulting in a weirdly formatted, chopped off looking screen. Again, I haven’t been able to reproduce this problem (and unfortunately didn’t grab a screenshot).

This concludes Part 2. Next: Installation Options and Reclaim Disk Space dialogs.

Fedora 18 Installer: Part 1

This is Part 1 of a multi-part review of Fedora 18’s updated and redesigned installer:

The new installer has been talked about in several Fedora 18 reviews. Opinions range from Igor Ljubuncic’s verdict of “Worst ever” and Alan Cox’s pronouncement that “The new installer is unusable” to Rob Zwetsloot saying “the new installer is a wonderful, minimalist designed app” and Hedayat Vatankhah’s statement that “with a new UI, it now looks good too.

This review will specifically cover how the installer works for a relatively complex installation: What happens if you have an existing server with multiple disks, multiple RAID arrays, multiple volume groups and logical volumes, and you want to install Fedora 18 in addition to what’s already on the system without wrecking the existing setup?

Technical content: HIGH
This post is primarily aimed at experienced Linux system administrators.

In a Nutshell

If you want a review in three sentences, here you go:

The Fedora 18 installer has some good points as well as some serious flaws. Overall, I think it is not as good as the existing installer, but that’s because it is a new, immature product. In the long term, I think it has the potential to become better than the current installer once all of the kinks and flaws get worked out.

A few specific items:

  • Some people may prefer the new look — it has a clean and simple design. It is, however, a shocking departure from the expected for people who’ve been using Red Hat distros for any length of time.
  • There are some poor flow, layout, and button naming decisions. These will probably be fixed as the new installer design matures.
  • The installer seems to have more of an “assume the installer is dumb” philosophy than previous versions. This may be helpful for Linux neophytes if done right (I’d argue that it’s not), but can be frustrating for experienced Linux admins.

Background

I maintain a “do everything” server in my home. It stores and serves files (including CD and DVD images), does PC backups, runs bittorrent, provides a squid caching web proxy, handles e-mail, runs an Apache web server, runs virtual machines (including a PBX In a Flash Asterisk server), and more.

This server runs Fedora. Every three versions of Fedora, I “upgrade” my server. “Upgrade” is in quotes because I don’t do a standard upgrade. Instead, I leave the existing install alone and intact, and install the new version of Fedora alongside it. If I have problems, I can just revert to the existing install. When everything’s functioning the way I want it, I permanently switch to using the new version. This approach has worked well for me through Fedora 6, 9, 12, and 15.

Now that Fedora 18’s out, it’s time to “upgrade” again.

My Test Setup

In the past, I’ve done my upgrades without testing beforehand. Given some of the things I’d read about Fedora 18, though, I decided this time around to test things out using a virtual machine first. Thus, I started by building a simplified virtual replica of my server in VirtualBox. This review is based on my experience on that virtual machine. If anything changes when I do the install on my actual server hardware, I’ll post an update.

Here’s how I set things up:

I installed Fedora 15 on the virtual machine. During setup, the six virtual hard drives on the machine (four 2 TB and two 1.5 TB) were partitioned as follows:

[table “” not found /]

Logical volume management was set up as follows:

[table “” not found /]

On my actual server, partition sizes were slightly different, and the unused partitions contain additional RAID-5 arrays which are also part of the vg.raid5 volume group. This was done so that if I later decided that I wanted to switch some or all of my storage to RAID-10 or btrfs that could be more easily accomplished.

Starting the Install

After an initial isolinux boot process, the anaconda installer starts up, and you’re presented with a screen where you select what language to use:

Language Selection

Click to view full size.

So far, this is pretty much exactly the same as any previous Fedora install. However, once you’ve selected your language, things suddenly get very different. In previous releases of Fedora you would next select your keyboard type, and then the installer would walk you through storage configuration, package selection, etc.

In Fedora 18, you’re instead immediately presented with this screen:

Initial install screen

Click to view full size.

Thumbs UpThis new setup is nice for a couple reasons:

First, it lets you skip configuration steps. For advanced installers, not needing to hit ENTER or click an extra “Next” button when you just want to accept default settings is nice.

Second, it shows at a glance if there is anything that you haven’t configured yet but are required to configure. No orange warning icons? Great — just click “Begin Installation” and be on your merry way!

Thumbs DownOn the other hand, there are a few problems:

Remember how I said above that you can skip configuration steps? Well… That can cause issues too. New users might accidentally neglect to change a setting that they really want to set. For instance, a user with a French keyboard who’s just using the mouse for the install might forget to change the keyboard type.

Others have also pointed out that a big orange bar and warning symbols dotting the screen isn’t exactly user-friendly. It can give users the impression that they’ve done something wrong and need to fix it.

Perhaps the biggest issue, though, is a (hopefully unintended) result of the way that the new installer does things in parallel. The installer throws screens up as quickly as it can, and lets the user start interacting with them even while it’s still doing things behind the scenes. In principle, this is a great idea, but it’s not implemented very well here.

When you first see the “Installation Summary” screen, it looks like the screen shot above, complete with a warning icon next to “Software Selection” and several greyed out sections. After a short while, the installer finishes probing storage and the “Installation Destination” section suddenly becomes available:

Installation Destination available

Click to view full size.

Then, after the installer finishes chugging through its software dependency checking, the “Installation Source” and “Software Selection” sections become available. The little orange warning icon next to “Software Selection” also magically disappears:

Installation Source and Software Selection available

Click to view full size.

This is just plain bad design.

Users should never be told that they need to do something when it’s really the program that needs to do something. And if that warning suddenly disappears after a few seconds when the program gets its act together, it may just confuse the user more.

Also, if a section is greyed out because the program is doing something, this needs to be made abundantly and obviously clear to the user. The installer does show status messages like “Probing storage,” “Downloading package metadata,” and “Checking software dependencies,” but these are themselves greyed out. A much better choice would be to display a progress bar or hourglass next to sections that will become available after the program finishes doing its behind-the-scenes work.

This concludes Part 1. Next: Part 2: Storage Device Selection and Selected Disks Dialog.