This is Part 2 of a multi-part review of Fedora 18’s updated and redesigned installer:
- Part 1: Nutshell, Background, My Test Setup, and Starting the Install
- Part 2: Storage Device Selection and Selected Disks Dialog (this part)
- Part 3: Installation Options and Reclaim Disk Space dialogs
- Additional parts are on their way.
This review specifically covers how the Fedora 18 installer works for a relatively complex installation: What happens if you have an existing server with multiple disks, multiple RAID arrays, multiple volume groups and logical volumes, and you want to install Fedora 18 in addition to what’s already on the system without wrecking the existing setup?

This post is primarily aimed at experienced Linux system administrators.
Storage Device Selection
In the Fedora 18 installer, once the initial Installation Summary screen finished probing hardware and checking software dependencies, there were no greyed-out sections left on the screen, and only one warning icon left. This was next to “Installation Destination.” Thus, logically, the first thing to do is to click on that.
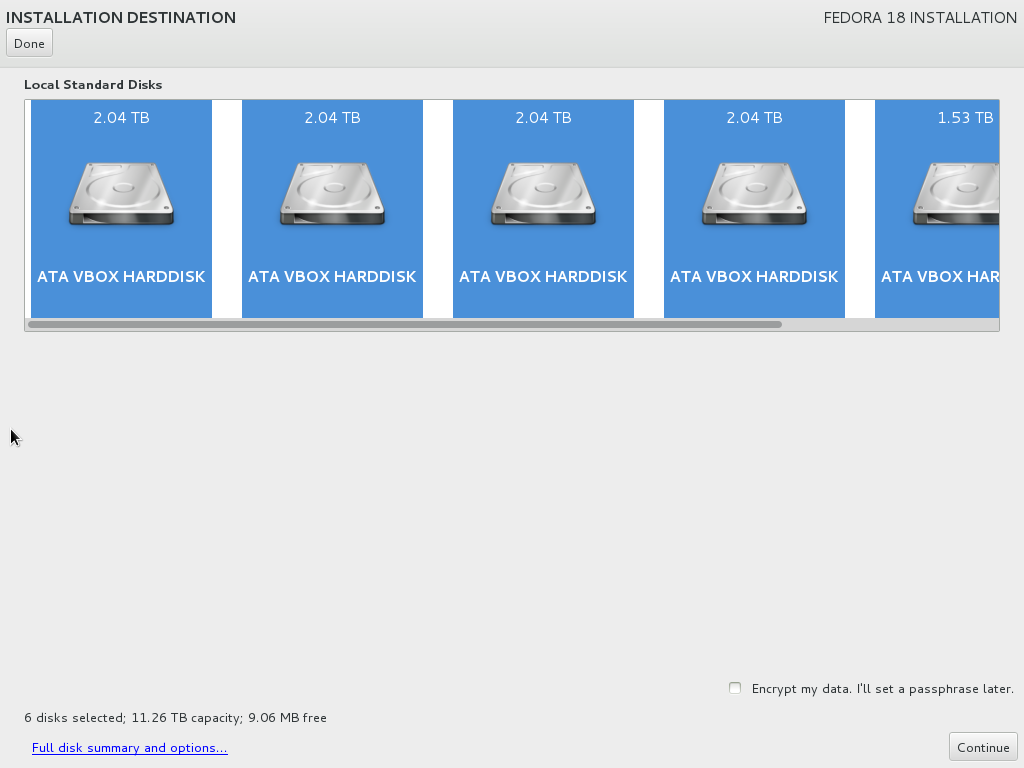
When you do so, you’re presented with a screen showing all the storage devices in your system, and a warning at the bottom: “No disks selected; please select at least one disk to install to.”
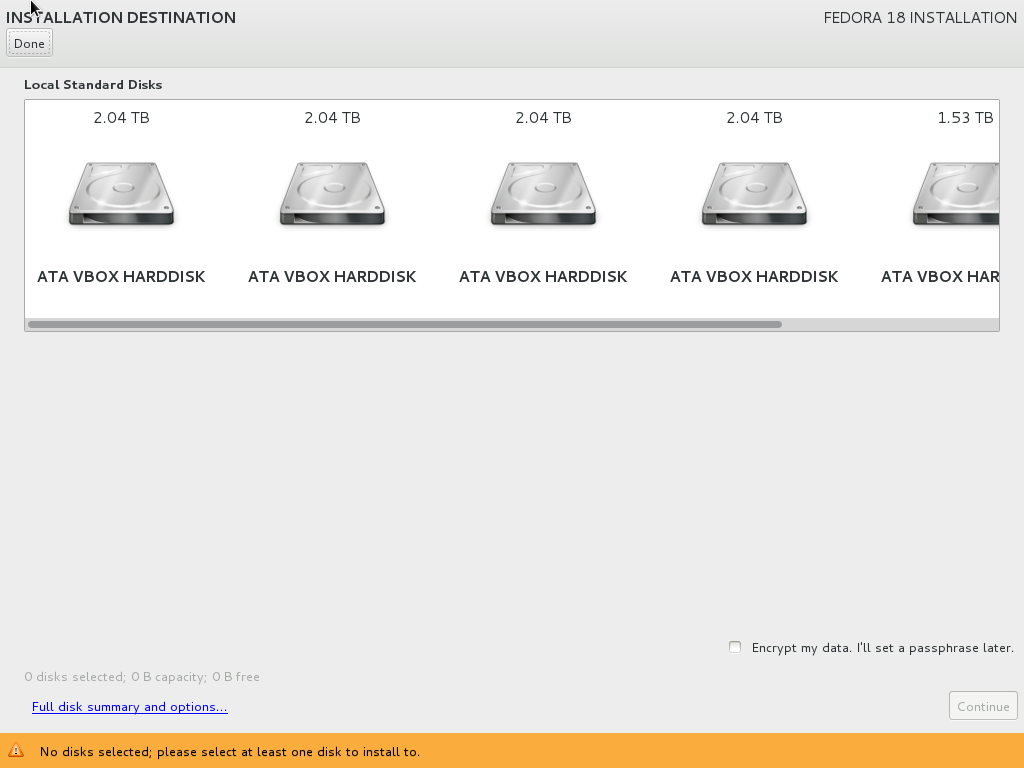
Click to view full size
 Once again, this screen has some pros and cons.
What’s good about this screen is that it provides a visually pleasing and simple view of the storage devices in your system. It tells you what kind of devices they are, and how big they are.
I wish that I had more good things to say about this screen, but that’s really about it.
 Honestly, there are far more bad things to say about it:
First of all, if you have multiple identical storage devices in the system, it’s not immediately apparent which device is which: It’s not clear if they’re listed with sda at the left and sdz at the right or vice-versa (and indeed, some people have reported their devices showing up in reverse order from what’s expected). You can figure out which device is which by hovering your mouse over each icon. A tool-tip will tell you the device name and ID. You shouldn’t have to do that, though. That should be immediately visible on the screen.
Second, there’s absolutely no indication of whether any given storage device has anything on it or not. If you have six devices that are completely allocated, or six devices with absolutely nothing on them, they look identical on this screen. The pretty icons are nice, but wouldn’t you rather see a bar or pie chart showing how much of each storage device is already allocated? Better yet would be something that shows you what’s actually on the device (e.g., 30% Windows, 40% Linux, 10% Other, 20% Free).
The final problem is the navigation buttons. Both the naming and placement of the buttons is poorly thought out. It’s pretty much a standard convention to put all your navigation buttons together at the bottom of a given screen or dialog box, usually either centered or to the right. In this case, however, you have a “Continue” button in the bottom right corner (which is greyed out until you select at least one storage device) and a “Done” button in the upper left.
Why on earth aren’t the navigation buttons together at the lower right?!?
Worse yet is that “Done” button. What happens if you bring up this screen and then realize that you’re not ready to do your storage configuration yet? What if you want to go back to the installation summary screen and pick packages first? There’s no “Quit” or “Back” button. Instead, the only button you can push is “Done,” even if you’re clearly not done.
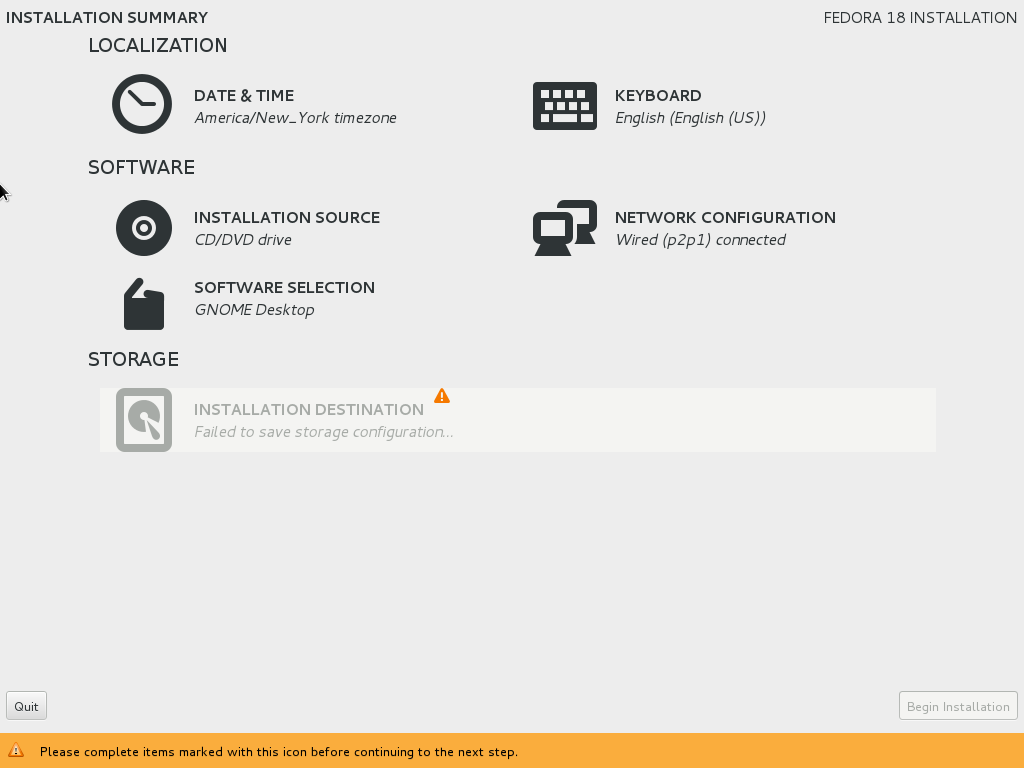
If you click that “Done” button without doing any storage configuration, it’ll take you back to the Installation Summary screen, where the Installation Destination icon will be greyed-out with an ominous sounding “Failed to save storage configuration” message:
Click to view full size.
It’s pretty clear that the installer doesn’t keep track of storage device state information internally. Instead, it appears to rescan the devices at various points, such as when exiting the Installation Destination screen and returning to the Installation Summary screen. This temporarily causes completely unnecessary and potentially anxiety-inducing warning icons to pop up on the Installation Summary screen.
The “Failed to save storage configuration message” will clear after a short while and be replaced with a “No disks selected” message. Installation Destination will then be available again.
If you just click “Done” on the Installation Destination screen, the installer’s behavior is not particularly nice. However, it can get much worse if you select a storage device before clicking that Done button.
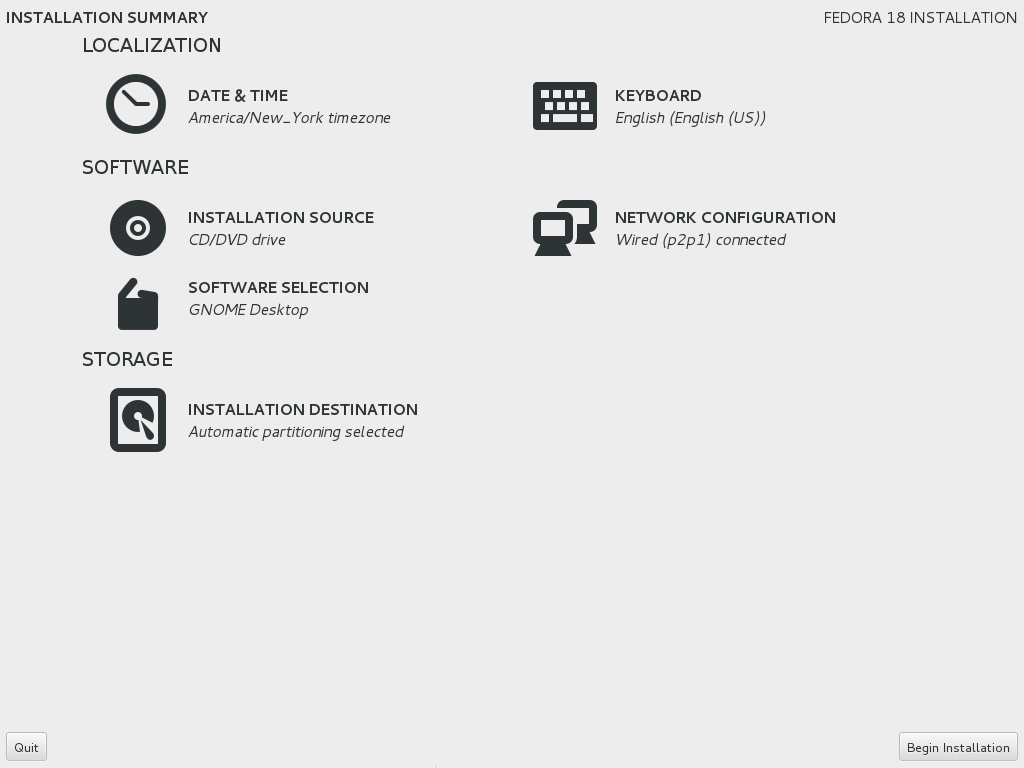
If you select one or more devices and then click the Done button instead of the Continue button, the installer will assume that you want to use automatic partitioning. If the storage device in question is blank or has enough space to handle an install, this works well, and it returns you to a nice clean Installation Summary screen:
Click to view full size.
However, it’s not obvious on the Installation Destination screen that “Done” means “Go ahead and do the rest automatically” whereas “Continue” means “I may want to do some customization.” As an expert user, I don’t like the fact that the installer doesn’t ask whether I really wanted to use automatic partitioning.
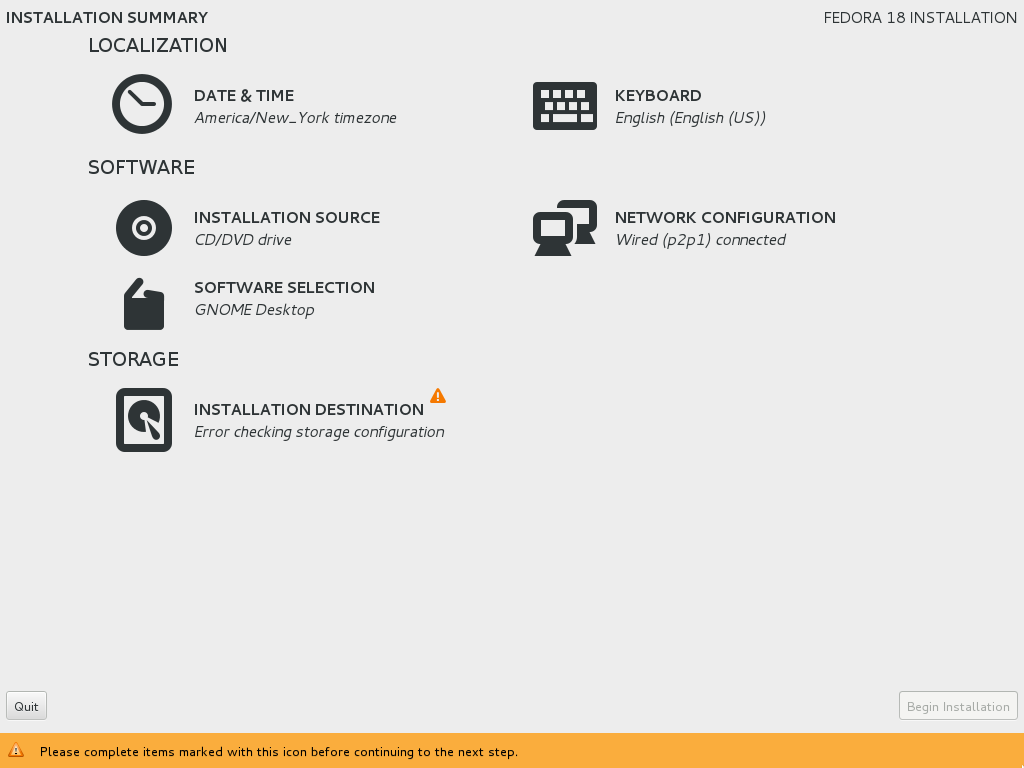
You may argue that doing automatic partitioning is a good idea if you just select some storage devices and then click Done, especially for inexperienced users. I can certainly see the logic of that argument. However, most inexperienced users will be probably installing on a system that already has a fully allocated disk. What happens if you just click Done in that scenario?
It’s not pretty. Upon returning to the Installation Summary screen, you’ll again get that ugly “Failed to save storage configuration.” However, this time it won’t revert to a simple “No disks selected” message. Instead, it will say “Error checking storage configuration”:
Click to view full size.
So… back to the Installation Destination screen you’ll go.
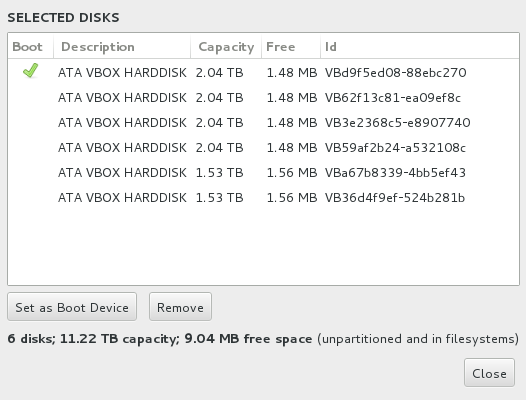
As you click on storage devices to select them, the number of disks selected, total capacity, and amount of space free will update in the lower left corner:
Click to view full size.
However, even after selecting storage devices, that’s all the information that you get. On this screen you can’t get any more detailed information about partitions that already exist on the devices, RAID or LVM configuration, etc. Even right-clicking on a storage device does nothing.
You get number of disks selected, total capacity, and total amount of space free. That’s it.
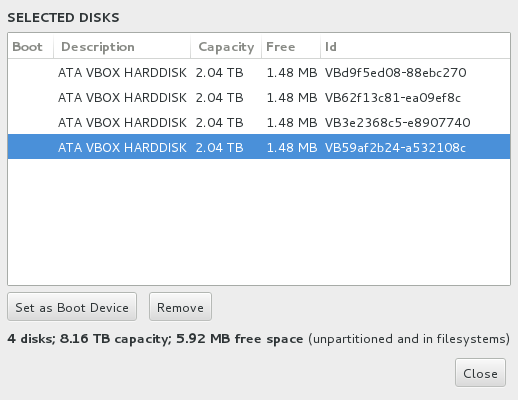
Selected Disks Dialog
There is a “Full disk summary and options…” link in the lower left corner of the screen. This is another example of the relative immaturity and inconsistency of the new installer design, as this isn’t a button. Instead, it has the appearance of a hyperlink — the only one to be found anywhere in the installer.
You might think that this will bring up additional detail on existing partitions, etc. for the storage devices. It doesn’t. If you click on that link, it brings up a dialog box that provides exactly two pieces of information not available on the previous screen: It tells you how much free space there is on each device, and it’ll tell you if one of the devices is set as your boot device. (It also shows the ID for each device, but that’s available in a tool-tip if you hover over the disk in the main screen.) Remarkably, even this dialog doesn’t show the device name (e.g., sda, sdb, etc.):
Click to view full size.
This dialog exhibits some potentially problematic behavior when it comes to automatically selecting and remembering the boot device:
When you bring up the Selected Disks dialog it will remember if a boot device was previously specified. If that storage device is still selected it will keep that as the boot device. If, however, no boot device has been specified, or if a device that was previously specified as a boot device is no longer selected, it will automatically select the first storage device from the devices that are currently selected as the boot device.
This may seem like obvious and correct behavior, but it can have some unintended side effects if you happen to bring up the Selected Disks dialog before you’ve selected the storage device that you want as your boot device.
For instance, if you select only sdf on the Installation Destination screen and then bring up the Selected Disks dialog, it will automatically select sdf as your boot device:
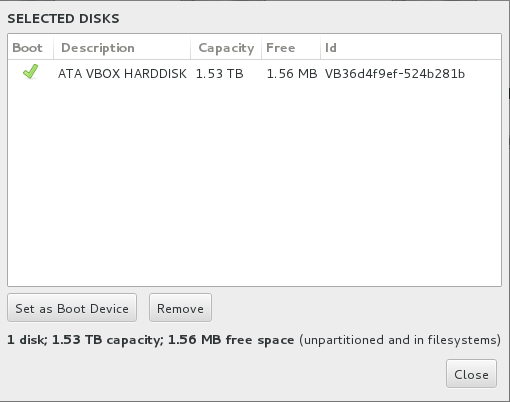
Click to view full size.
If you then close the Selected Disks dialog, select additional storage devices, and bring up the Selected Disks dialog box again, the installer will still think that sdf should be your boot device:
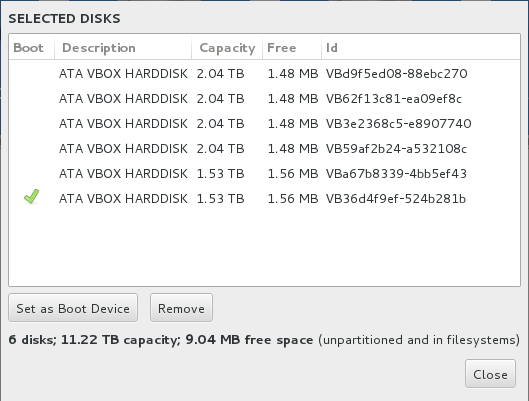
Click to view full size.
This is admittedly a fringe case, but it’s another example of an area where the new installer simply isn’t mature. Personally, I’d suggest that better behavior would be to only remember a selected boot device if the user manually specifies one. If the user didn’t manually specify a boot device, then the installer should re-select the best boot device from the selected storage devices each time the dialog is brought up.
One final note on the Selected Disks dialog: In playing around with the installer, this is one area where I encountered bugs on a few occasions. For instance, at one point I managed to somehow confuse the installer into having no boot device selected:
Click to view full size.
I haven’t yet been able to figure out how I managed to do this or reproduce the problem, but at least the installer seemed to recognize that there was a problem, as it draped an orange warning bar across the bottom of the screen complaining that “You have chosen to skip bootloader installation. Your system may not be bootable.”
At another point, I managed to confuse the system into apparently thinking that the part of the screen where it could display the storage device selection list was smaller than the rest of the screen, resulting in a weirdly formatted, chopped off looking screen. Again, I haven’t been able to reproduce this problem (and unfortunately didn’t grab a screenshot).
This concludes Part 2. Next: Installation Options and Reclaim Disk Space dialogs.